This website uses various technologies including cookies for personalization, website usage and performance measurement, and targeted advertising. Information about your site visit may be stored by or shared with third parties as described in our Privacy Policy. By continuing to browse, you agree with our collection and disclosure of your information.
Cookie Settings
This website uses various technologies including cookies for personalization, website usage and performance measurement, and targeted advertising. Information about your site visit may be stored by or shared with third parties as described in our Privacy Policy. By continuing to browse, you agree with our collection and disclosure of your information.
Strictly Necessary
This website uses various technologies including cookies for personalization, website usage and performance measurement, and targeted advertising. Information about your site visit may be stored by or shared with third parties as described in our Privacy Policy. By continuing to browse, you agree with our collection and disclosure of your information.
This website uses various technologies including cookies for personalization, website usage and performance measurement, and targeted advertising. Information about your site visit may be stored by or shared with third parties as described in our Privacy Policy. By continuing to browse, you agree with our collection and disclosure of your information.
NO MINIMUM ORDER - SAME DAY SHIPPING
One or more installed browser plugins are blocking URL parameters. To properly calculate savings, or to checkout, you must disable it before you continue. Please click HERE after you disabled it to retest, or HERE for an instructional video
You've just bought (or are going to buy) the most powerful starter available in the aftermarket: The Delco Remy 39MT. It cranks up to 30 percent faster than the competition (and offers over-crank protection), it's built with advanced circuitry and its electrical soft start technology increases overall product life. All starter failure issues are about to be a thing of the past. No more endless clicking when you try to start your truck. No more slow cranking and praying for the engine to start. No more turning the key in the ignition with no response whatsoever.
You have the starter with the perfect balance of power and reliability.
Now, the only thing left to do now is to install the darn thing.
Step One: Getting The Right Specs
There's nothing worse than ordering a part and finding out later that it doesn't fit the specifications of your truck or your engine.
Step Two: Be Prepared and Install Safely
The most important part of any installation begins with safety. Here's a checklist of how to be properly and safely prepared:
ALWAYS use proper eye protection when performing any mechanical repairs or installations. Failure to use the proper protection for your eyes can lead to serious and permanent injury.
ALWAYS disconnect the battery ground before removing or replacing any cables at the starter. Failure to do so can lead to serious injury to yourself and your vehicle.
ONLY perform mechanical functions that you are properly qualified to perform. We respect do-it-yourselfers but we recommend that only experienced mechanics install these starters
Step Three: Things To Keep In Mind Before Installation
Note the Design Change
The gear reduction starter may look different on first glance than the 39MT than the starter that's it's being replaced with. Most Delco models incorporate a noseless design and don't include a cone around the starter drive. Despite the difference, the starters are completely interchangeable with straight drive nose-style starters.
Ensure The OE Spacer Is In the Correct Location
The OE Spacer is actually part of the engine. It ensures proper clearance between the starter pinion gear and the engine ring gear. If the OE Spacer is in use, you need to transfer it to the new starter or damage can occur.
The OE spacer may also be stuck to the old starter. If you're missing your OE Spacer or are at all unsure, we recommend you contact the manufacturer of the engine to be positive.
Make Sure the IMS is Equipped and Positioned Correctly
The Integrated Magnetic Switch (IMS) is an application that reduces voltage drop and helps establish the solenoid to receive maximum voltage for all starting conditions. If there is an IMS attached to the new starter, do not remove or uninstall it. That could result in nasty control circuit problems and could also screw up your warranty. In the case of a firewall mounted magnetic switch, the best recommendation is to bypass this switch and use the IMS on the new starter.
Also, take note that the IMS has the same amount of leads (cables) as the previous starter that it's replacing. There are two types, 3-wire, and 2-wire configurations. They are not interchangeable
Drain Opening Locations
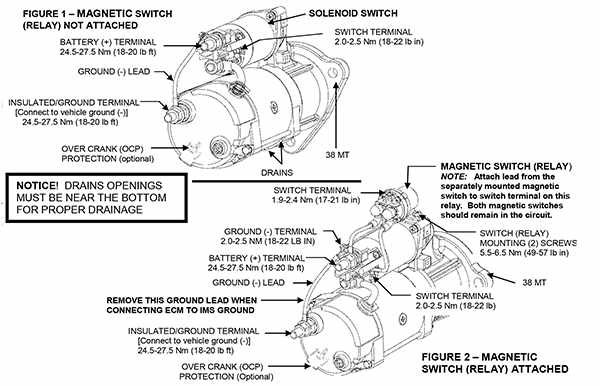
Before mounting the starter, it is VERY IMPORTANT that all drain openings are located below a horizontal position. Since the drains are near the bottom, it assures for adequate drainage. See Figure 1 below.
Starter Cable Lengths
Lastly, make sure that your starter cable lengths are long enough to reach the battery. If they in any way restrict normal engine movement it can provide big consequences later on in travel.
Step Four: Removing the Old Starter
Before we can install our beautiful 39MT, we need to remove the old starter.
Though we said it before, we'll remind you again: ALWAYS disconnect the battery ground before removing or replacing any cables at the starter. Failure to do so can lead to serious injury to yourself and your vehicle. Now that we've done that, let's keep track of a few things so that we're ready to install our new starter.
Identify and tag all leads from the battery when removing the old starter so that we can use the same electrical connections for the new starter.
Make note of the flange-mounting position. It'll come in handy in Step 5.
Step Five: Repositioning the IMS
When the previous starter has been safely removed, it's time to actually start installing the starter.
Before we can mount the starter, we need to make sure that the IMS is positioned correctly. Since some applications have a tighter fit between the frame rail and the engine, the IMS needs to be mounted to one of the other six mounting positions on the 39MT. If this is the case with your starter's engine application, then this step will need to be done before we can mount the starter to the engine.
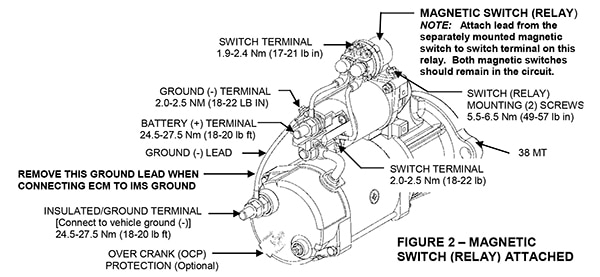
On the 39MT, remove the two IMS mounting screws and loosen fasteners that attach the IMS leads to the solenoid to create some flexibility when moving the IMS. Then reposition the IMS by moving it to the best of the other six mounting positions so that it'll be unobstructed while working in the engine. Once you've found the best mounting spot, refasten the mounting screws and torque the fasteners according to the values in figure 2 below, so the cables are tight and ready to go.
Step Six: Mounting The Starter
Now that our IMS is configured to a spot where it won't be obstructed, it's time to clock the starter so that it's ready to mount onto the engine.
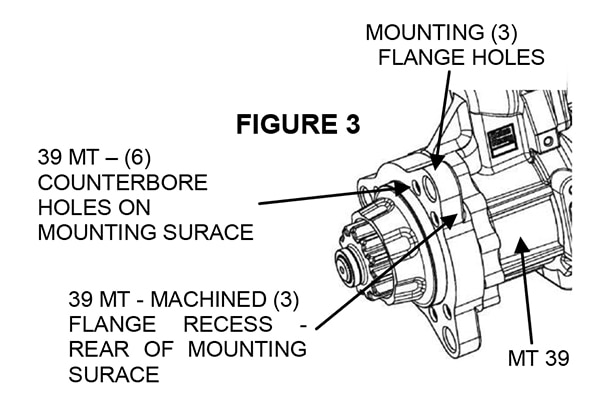
Most 39MT models contain rotatable flanges, making them workable with several different engine and vehicle applications. However, before the starter is mounted, it needs to be clocked to the correct position. We do this by placing the old starter next to our new 39MT starter so that the pinion gear is facing us. If the flange is in the same position as the original starter, then there's no need to clock. However, if it is different, we'll need to take out the six Torx screws than rotate the flange so that it matches the previous starter, then we'll put the Torx screws back
If there's a case where we don't have the original starter, we can take the starter and line it up to the mounting position to the engine without mounting it. If there are no obstructions, then just mount the starter normally. If there isn't a clear spot for the starter, rotate the flange to the position with no obstructions, then refasten the Torx screws to the flange.
Once your starter has been correctly clocked, it is free to be mounted correctly onto the engine!
Note: Starters with up to 16.6 to 16.9mm diameter mounting flange holes can be mounted with 12.7mm mounting bolts. Hex Head Cap Screws (Grade 5) or harden washer (Grade 5 or better) must be used. Don't use any lock washers, star washers or soft washers with the starter mounting bolts.
Step Seven: Electrical Connections
Our starter is mounted to our engine without any obstructions, now it's time to set up the electrical connections.
Before we connect our cables to the battery, we want to make sure to clean or wire brush the terminals so that the bare metal is exposed for optimal electrical connection.
In Step 3, when we removed the starter, we made note of the proper positions and places for the leads to be connected to the battery. Now it's time to connect the leads from our new starter to those same places. Note: Make sure your connecting the cables to the correct solenoid terminals, since they may be reversed on the previous starter.
Secure all electrical connections from the IMS to the battery, and your starter has been successfully installed!
Before You Hit the Road...
A couple more things to keep in mind now that you've installed your starter:
Ring Gear Damage
Problems with starting most often come from the starter or the solenoid switch, but in some cases, the issue lies with the ring gear. It's important that you check to make sure that there's no damage to the engines ring gear, otherwise, it could lead to premature failure of the starter and you could lose your warranty because of it.
CCA Damage From Batteries
Excessive Cold Cranking Amperes can damage your starter. The maximum CCA ratings for batteries for the 39MT is 2500 CCA at 12 volts and 1250 CCA at 24 volts.
If You're Having Trouble
If you're missing out on the best truck starter on the market, here's some more info and how you can purchase Delco Remy starters today.