This website uses various technologies including cookies for personalization, website usage and performance measurement, and targeted advertising. Information about your site visit may be stored by or shared with third parties as described in our Privacy Policy. By continuing to browse, you agree with our collection and disclosure of your information.
Cookie Settings
This website uses various technologies including cookies for personalization, website usage and performance measurement, and targeted advertising. Information about your site visit may be stored by or shared with third parties as described in our Privacy Policy. By continuing to browse, you agree with our collection and disclosure of your information.
Strictly Necessary
This website uses various technologies including cookies for personalization, website usage and performance measurement, and targeted advertising. Information about your site visit may be stored by or shared with third parties as described in our Privacy Policy. By continuing to browse, you agree with our collection and disclosure of your information.
This website uses various technologies including cookies for personalization, website usage and performance measurement, and targeted advertising. Information about your site visit may be stored by or shared with third parties as described in our Privacy Policy. By continuing to browse, you agree with our collection and disclosure of your information.
NO MINIMUM ORDER - SAME DAY SHIPPING
One or more installed browser plugins are blocking URL parameters. To properly calculate savings, or to checkout, you must disable it before you continue. Please click HERE after you disabled it to retest, or HERE for an instructional video
More than forty years ago Bendix ignited a revolution in the heavy-duty truck industry with a dream. A dream to provide clean air to reservoirs, valves, and all air controlled systems in a vehicle. A dream to filter out contaminants in airways that caused heinous maintenance episodes and downtime that felt like it lasted a lifetime. That dream was the Air Dryer: an air filtering mechanism that removes dirt, liquid, water vapor and even oil from your truck's air system. Forty years later, the apple hasn't fallen too far from the tree. Bendix still makes some of the most reliable Air Dryer systems in the aftermarket.
Any vehicle that doesn't have an Air Dryer installed is considered archaic. And if you're bypassing a bad Air Dryer system, then you're doing a disservice to your truck. So today, we're going to get you started on a new Bendix Air Dryer and walk through how easy it is to install one.
Step 1: Getting the Right Air Dryer
There are plenty of solid air dryers on the market, but like we said before, Bendix is among the most trusted. Bendix Commercial Vehicle Systems supplies several unique – each with different qualities.
It's important that whichever replacement air dryer you purchase aligns with your vehicle specifications. Make sure that the voltage of the dryer's heater matches that of the engine, and the purge volume matches that of the reservoir container. You'll also want to make sure that your air dryer is compatible with the correct sized air compressor.
Once you have received the right Bendix air dryer for your application, we got your back with easy installation steps. We're using the AD9 Air Dryer for our example, so note there may be some slight changes in installation for other Bendix Series Air Dryers. Those changes can be found on the part numbers product page on our site.
Step 2: Always Be Prepared and Install Safely
We're always looking out for you here, meaning we're going to spend a little time talking about safety measures before you start installing your new Air Dryer.
ALWAYS put the vehicle in park before doing any work. Make sure it's on a level surface and that the parking brakes are applied. To be extra safe, also block the wheels of the truck. Make sure the engine is stopped and the ignition key is removed
ALWAYS wear safety glasses before starting any installation.
MAKE SURE that any auxiliary pressurized air is drained from ALL reservoirs before beginning ANY work.
FOLLOW all of your vehicles procedures when deactivating the truck's electrical system.
Step 3: Mounting the AD9 Air Dryer
Before we drop our Air Dryer into our air system, there are a couple of things we need to keep in mind when choosing a place to mount it.
First, the air dryer always needs to be mounted vertically with the purge valve's exhaust pointed down towards the surface of the road. This way the air dryer can properly purge out contaminants that it filters out from the truck's air system.
The AD9 Air Dryer needs to be as close to the first supply reservoir as possible, nor can the dryer be close to any heat-producing components like the vehicle's exhaust. The AD9 needs as much space as possible to adequately filter and purge contaminants from your air system and not be affected by any other moving parts of the vehicle.
Lower Mounting Bracket
Once you've found a good place to mount the Air Dryer, You'll need to remove the end comer bolts and washers on the lower bracket and discard them. We'll use the two 2-3/8 inch long cap screws, nuts and washers provided with the AD9's retrofit kit. Always keep in mind which screws you use from the Air Dryer, we want to make certain that the piping connections are still easily accessible for connection into the air system. The best practice is to torque to around 270-385 in. lbs.
Upper Mounting Bracket
Now that our lower mounting bracket is secured we can finish mounting with the top of the Air Dryer. A general rule for spacing with the upper and lower brackets is a minimum of 5.5 inches apart to be effective. We'll use the 5/16 of an inch cap screw and sleeve nut to secure the upper mounting bracket to the Air Dryer, without tightening the strap. Once everything is in place we'll mount the upper bracket to the vehicle using 3/8 inch bolts and washers, torquing to 25 ft. lbs. When it's secure to the vehicle, then we will torque the 5/16 inch nut to 80-120 in. lbs. and complete our mounting of the Air Dryer.
Step 4: Connect the Air Lines
Our Bendix AD9 Air Dryer is locked and secured into place and now it's time to connect it to the Air System. To do this, we need to connect two air lines in order for it to work properly.
Purge Control Line
The purge control airline connects the Air Dryer directly to the governor. When installing the line, ensure that the inside diameter is a minimum 3/16 inches between the AD9's end cover control port and the unused unloader port on the governor. The control line needs to slope downward to the end cover so it doesn't create any potential water traps.
Purge Exhaust Line
The discharge line directs all the contaminants from the air system away from all of the vehicle's other components. It's always safe to get a special exhaust cover for the AD9 Air Dryer (don't worry we have the part here) so that we can clamp a special one-inch I.D. hose that ensures the exhaust properly exits the system
Step 5: Wiring the Heater
Our Air Dryer has been secured to our vehicle's undercarriage. Both our air lines are in good shape. Last but not least we need to wire our heater and it's thermostat.
We mentioned this before, but just to refresh your memory, we need to make sure our heater has the same voltage as our vehicles electrical system, otherwise, it could provide too little or too much energy to our new AD9 Air Dryer.
The Air Dryer system is built with a two-lead, 12-inch wire harness. One of the two wires needs to be connected to the engine kill/ignition switch, and with that it needs a fuse installed (10 amp for 12 Volts, 5 amp for 24 Volts).
The other wire lead needs to be connected to a suitable vehicle ground. This does not include any part of the Air Dryer or it's mounting bracket.
If in any case, you need to lengthen the wire harness, you'll need to use a 14 GA wire with waterproof wire splices. Make sure you tie and support all electrical wire to and from the engine to the Air Dryer, but keep in mind it should still have some slack and not be completely taught.
Step 6: Testing out the AD9 Air Dryer
We're so close. Everything is hooked up and ready to go. Let's just run a few tests to make sure we're ready for service.
Close all the drain cocks and valves so pressure can begin to build up
Build up the pressure in the air system to the governor cut-in and make sure that the AD9 Air Dryer purges
Fan the brakes to also build pressure up to test the purge cycle of the AD9
Double check any air system leakage, whether it be from the compressor's unloader mechanism, the governor or any of the drain valves and connections leading to the Air Dryer
MAKE CERTAIN that before you return the vehicle to service, you make certain all components and systems are restored to their original operating condition, especially the air and electrical systems.
If the AD9 passes all these tests on your vehicle than you're ready to take off the blocks and get on the road!
Contact us for more information on Bendix parts for your heavy-duty application or create an account to get started!
 More than forty years ago Bendix ignited a revolution in the heavy-duty truck industry with a dream. A dream to provide clean air to reservoirs, valves, and all air controlled systems in a vehicle. A dream to filter out contaminants in airways that caused heinous maintenance episodes and downtime that felt like it lasted a lifetime. That dream was the Air Dryer: an air filtering mechanism that removes dirt, liquid, water vapor and even oil from your truck's air system. Forty years later, the apple hasn't fallen too far from the tree. Bendix still makes some of the most reliable Air Dryer systems in the aftermarket.
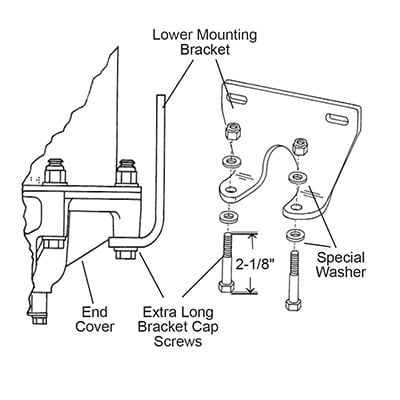 Step 3: Mounting the AD9 Air Dryer
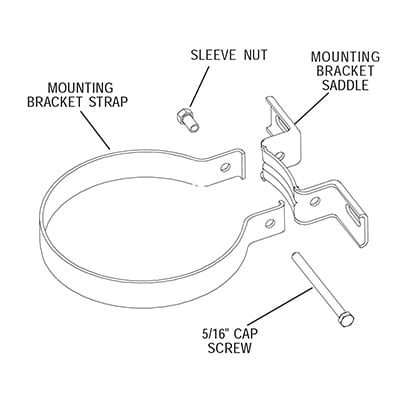 Upper Mounting Bracket
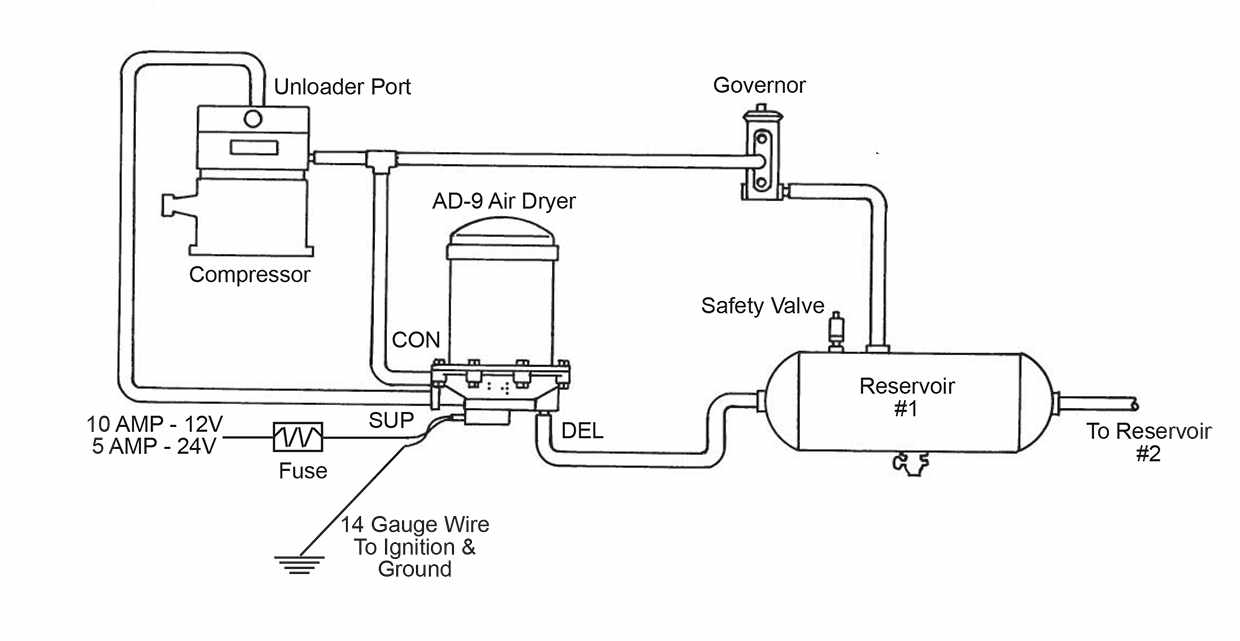 Our Bendix AD9 Air Dryer is locked and secured into place and now it's time to connect it to the Air System. To do this, we need to connect two air lines in order for it to work properly.